"How to ..." for Detroit Mercy websites
Cascade Training Videos
1: Intro to websites & Cascade

2: Navigating Cascade

3 - Editing Basics

4 - Page Layout Options

Cascade Quick Reference
Help videos from Hannon Hill:
- Intro to Cascade 8: The Dashboard
- Creating Content
- Drafts and Working Copies
- Context Menu
How do I .... and Tips
Accessibility Help
-
Linking to the catalog
A common mistake is to link to a particular year's catalog (which means that within a year, the link will be outdated). Instead, use special “evergreen” course links that will always point to the most-recently-published version of the catalogs. These evergreen links replace part of a catalog URL as follows:
- For the undergraduate catalog:
/catalog/ugcatalog/
replaces /academics/catalog/undergraduateYEAR-YEAR/ - For the graduate catalog:
/catalog/gradcatalog/
replaces /academics/catalog/graduateYEAR-YEAR/
Example link
DON’T USE:
https://udmercy.edu/academics/catalog/undergraduate2023-2024/colleges/cba/5yr-acct-mba.php
DO USE:
https://udmercy.edu/catalog/ugcatalog/colleges/cba/5yr-acct-mba.phpThe latter will always link to the last-published catalog year.
And yes, this kind of evergreen linking does require manual editing of links to the catalog. The advantage, once done, is that the link will work for years to come and always be up-to-date. This avoids the serious issue of sending people to outdated descriptions of University offerings.
- For the undergraduate catalog:
-
Telephone number links
Many of our website visitors view the site on their phone, so it makes sense to provide active telephone links that they can use to initiate a phone call. Here's how:
- In Cascade, edit the page in question.
- Add or find the phone number in the page text and select it.
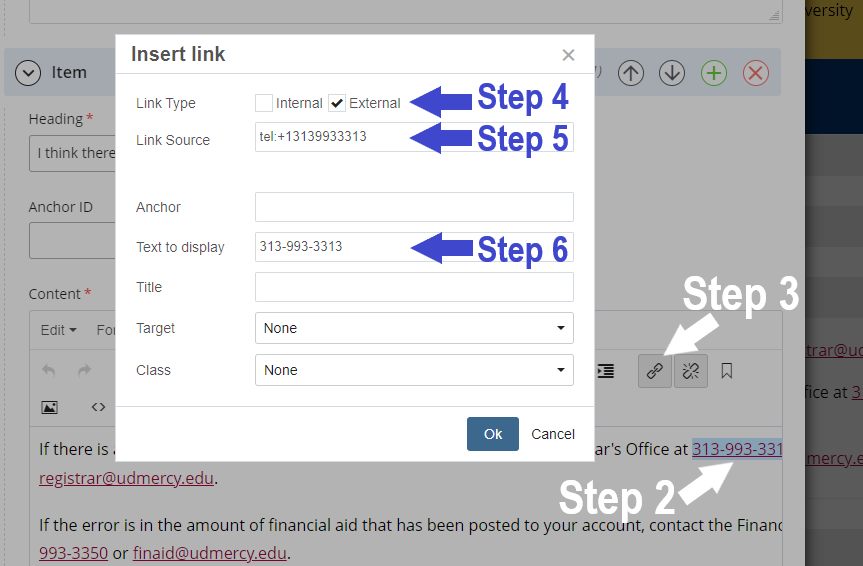
- Click the Add/Edit Link button (shown below).
- Set the Link Type as "External"
- Set the Link Source as follows:
tel:+13139930000
"tel:" indicates a phone number link;
"+1" should precede any phone number;
"3139930000" is the area code and phone number, which of course should be changed to the phone number you want. - Set the Text to display as the phone number in our correct University style, with dashes only (no spaces, no parentheses), like:
313-993-0000
See the example screenshot below, labeled with the steps above:
-
Printing / saving webpages
Printing webpages can result in a garbled mess. This is often a result of the webpage header and navigation elements intruding on the main body content. Here's one way you can remove unnecessary page elements to get a cleaner printed version of webpage content. You can also use these steps to save a clean PDF of webpage content.
- Install the “Print Edit WE” extension in Firefox. (Apparently the same extension is available for Chrome, but as of this writing we haven't tested Chrome.)
- Go to the webpage you want to print.
(Cascade users can print pages directly from Cascade, even if the page has not been published to the website. Go to the page in Cascade, then use the “… More” link in the upper-right corner and select “Full Screen Preview” – this will display the page in a new browser window without the Cascade interface elements.) - Make sure to expand all the accordion sections on the page.
- While viewing the page you want to print, click the Print Edit WE button in browser toolbar – the icon looks like a blue pencil on a printer.
- Hover your mouse within the body content area of the webpage, so that a red outline encloses all the body content (and not just a single heading or paragraph). You'll often find this hover spot somewhere between the page title and the next line. The idea is to get the red outline only around the entire body content, while excluding the page header (especially) as well as the page footer and navigation elements.
- With the body area outlined, click to select it. The selected area will be highlighted in red. You can scroll the page to make sure all the body content is selected. (You can also select smaller, particular parts of a page if you want. These instructions assume you want to print all the body content of a webpage.)
- Next, on the Print Edit WE toolbar at top of browser window, click the “Hide Except” button. This will hide all the webpage elements except what you have selected. (With our page design, this may leave a white space gap at top and bottom of page, where header and footer were.)
- Now, on the Print Edit WE toolbar, click the “Tools” button and select “Fix Page Breaks – All”
- Then click the “Preview” button on the Print Edit WE toolbar. This will bring up the Print dialogue to use as you typically would. Often in this dialogue, you also have the option to save the cleaned-up page as a PDF. Note, when printing/saving, you may wish to omit the last page if it’s blank (from that white footer gap).
- Print your webpage content in all its glory!